Sunday, September 14, 2014

King Baker's Recipe #18: Homemade Mixed Berry Jam

KING BAKER'S RECIPE #18: Homemade Mixed Berry Jam


With summer coming to a close, I still want to treasure the smells and tastes of summer. I am a huge lover of fresh berries. I buy so much that I end up not knowing what to do with them. This recipe is for any type of berry. Perfect jam to spread on some toast, or make a tart or many other things.

The Equipment for both recipes you will need is:
1x Large Pot (A large pasta pot will work)
1x Large Heavy-bottom pot
1x Large Glass cup with a spout and a handle
1x Wooden Spoon
3x-4x Mason Jars with Lids and twist lids.
1x Thongs or grabbing equipment
1x Baking Sheet lined with a Towel
1x Potato Masher

Prep Time: 20 minutes
Cooking Time: 30-45 minutes and 20 minutes extra

Ingredients:
1 POUND of Strawberries
1/2 POUND of Blueberries
1/2 POUND of Raspberries
1 1/2 CUP White Granulated Sugar
1/2 Lemon
1/4 TSP Salt


Procedures:

1) In your large Pasta Pot, Place your jars and lids, off the jars, in the pot. Fill it with hot water until it is about an inch above the jars. Bring to a boil. (It bubbles appear on the jar, then it will be fine. Mine never comes to a roaring boil, but bubbles form and you are just sterilizing the jars.)

2) Make sure you wash your strawberries, pat dry and cut into small pieces. Wash your blueberries and pat dry and place with the strawberries in a separate bowl. Just place raspberries in the bowl with the other fruit without washing them.

3) In a large heavy bottomed pot, place all your berries, sugar, lemon juice,  and salt. Turn stove on medium high and stir. Blend the berries and sugar mixture well. Bring to a boil and cook until it becomes thick and jam like. Should take anywhere between 30-45 minutes. If it starts over boiling and splatters everywhere, turn the stove off for 30 seconds and turn on medium-low.

4) After it's done, using your tongs or any grabbing equipment, take the jars and lids out of the boiling water and place on the baking sheet lined with a towel. 

5) Take your jam mixture and place it in the large cup with a spout. Slowly pour the jam into the jars leaving about 1/2 inch from the top. Place the lid on the jar and screw the second lid on, but don't screw it on tight. Screw it on just tight enough so that water doesn't get into the jars.

6) Place the jars back into the water and let them sit for 20 minutes EXACTLY.  No more, no less.

7) Take the jars out and place them back on the baking sheet. Screw the lids on as tight as they will go as soon as they come out of the water. Let them set out on a flat surface for over night. You may hear popping coming from the lids. THAT IS GOOD!!  You want the lids to pop. That means you've placed the lid and did it right. If one doesn't pop, then you need to use that jam first. That's why you need to let them set out over night. 

This Jam recipe is easy to double up to make more jam. Plus you can freeze the jam and it keeps really well! ENJOY!!!! 

HAPPY BAKING!

Saturday, September 13, 2014

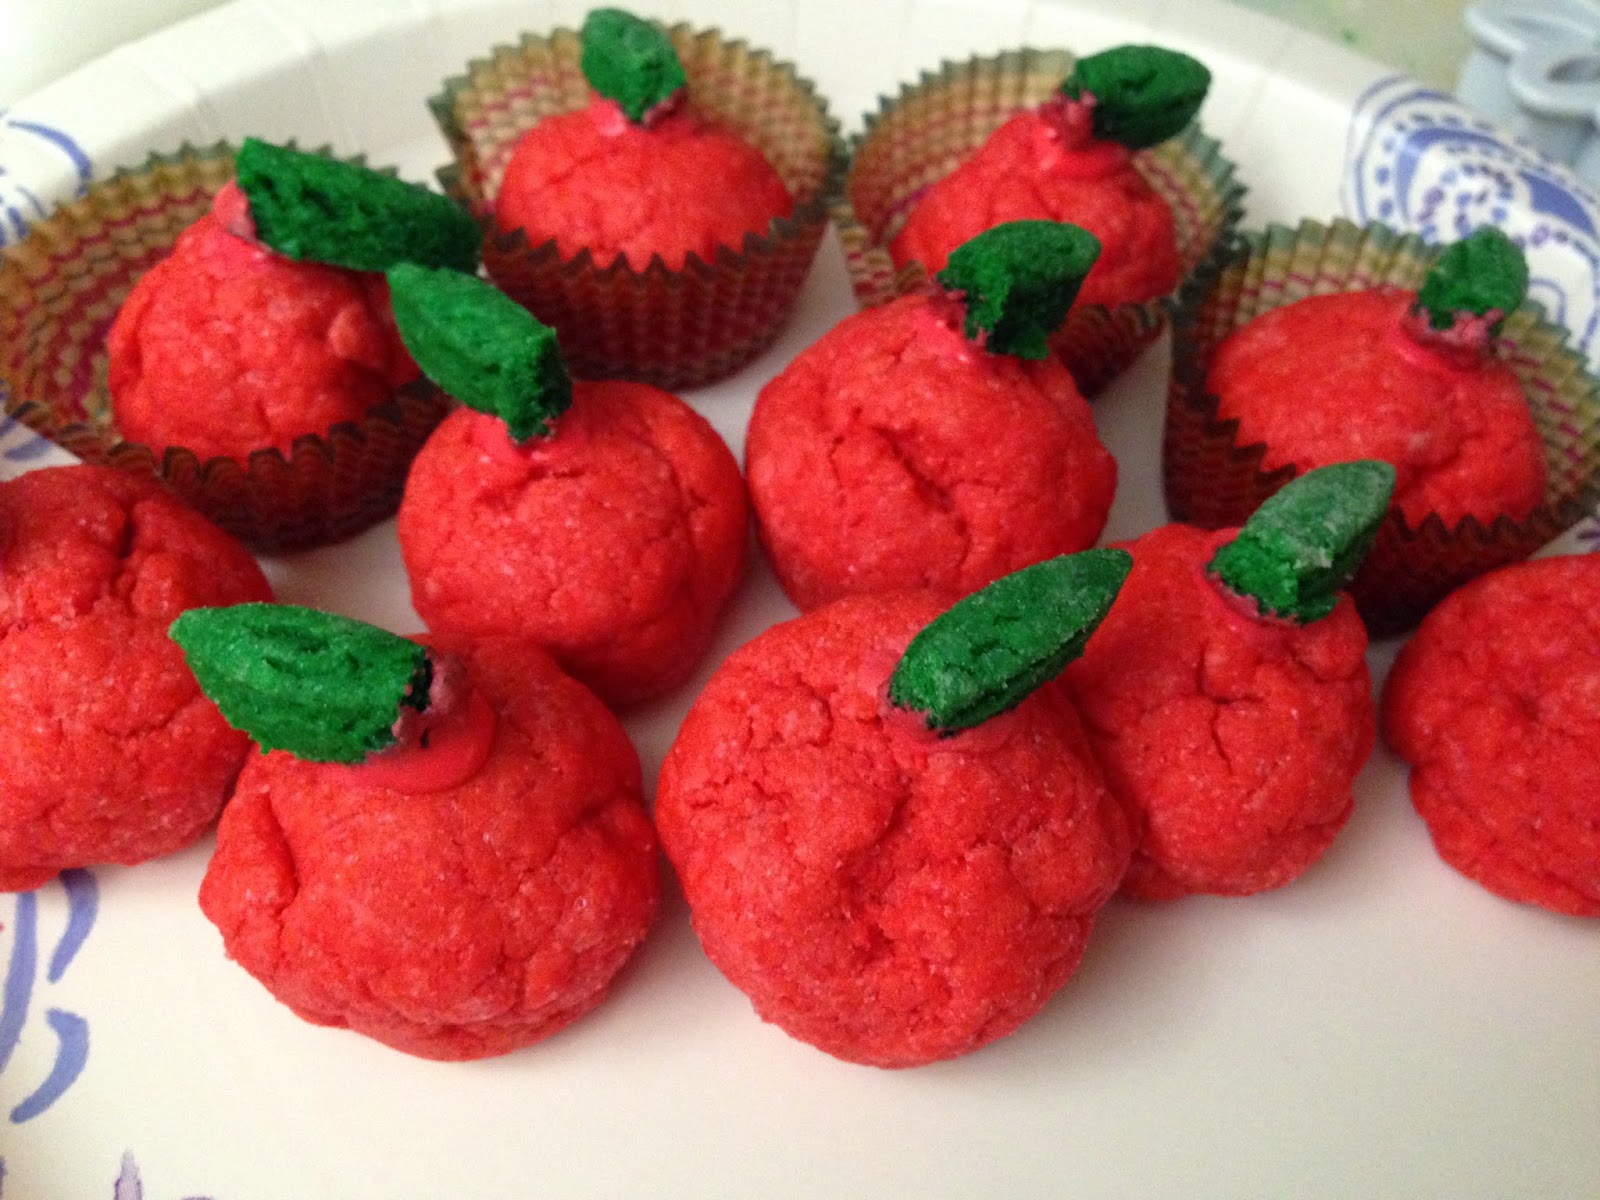
King Baker's Recipe #17: Back-to-School Teacher's Apple Cookies

KING BAKER'S RECIPE #17: Back-to-School Teacher's Apple Cookies


September. That means everyone is back in school! All the stress of homework and teachers and friends makes each year exciting! A tradition is to give a teacher an Apple before the day starts. How about trying something new? Make these delicious Teacher's Apple Cookies! They are simple to make and fun for the teacher! 

The Equipment for both recipes you will need is:
1x Mini Muffin Pan (or Large Muffin Pan for large apples)
Mini or Large Muffin Liners
1x Bowl (or Stand Mixer fitted with the paddle attachment)
Leaf or Flower Cookie Cutters
1x Baking sheet
Parchment paper

Prep Time: 20 Minutes
Baking Time 10 Minutes and 18 Minutes

Ingredients:
1 1/2 CUP All Purpose Flour
1/4 TSP Baking Powder
1/2 CUP Unsalted Butter
1/2 CUP Sugar
1 Large Egg, lightly beaten
1/2 TSP Vanilla Extract
1/4 TSP Salt
Red and Green Food Gel Paste
Pretzel sticks
Red Royal Icing

Procedures:

1) Preheat your oven to 350 degrees F.

2) In the bowl of your stand mixer, fitted with the paddle attachment, cream butter and sugar until lightly fluffy.

3) Add in your egg and vanilla and blend well. Add all your dry ingredients, slowly until mixed well.

4) Turn onto the counter and knead the dough until it comes to a ball. If the dough ball is sticky, place in the fridge to chill.

5) Separate the dough by 3rds. Take 2/3 of the dough and form into a large ball. The larger of  dough ball, dye it red. Dye the smaller dough ball green.

6) Take a small portion of the red dough and roll it into balls. Place them in the mini muffin pan lined with liners. Roll out the green dough until it's 1/4 inch. Take a leaf or flour cutter and cut out some leaves or flowers. Place on a baking sheet lined with parchment paper

7) Place both the red dough balls and the leaves/flowers in the oven. Bake in the oven on 350 degrees F, the Red dough balls for 18 minutes and the leaves/flowers for 10 minutes.

8) After they are taken out, cut the peddles off the flower cookies if you used flower cutters. These will act as the leaves on the apple. As soon as the Apple cookie comes out, immediately place a pretzel stick in the center while they are still hot.

9) Take the apple cookies and lightly, and smally brush on some royal icing and place the leaves on the cookie. Let set and ENJOY!!!!!

HAPPY BAKING!

Wednesday, September 10, 2014

King Baker's Recipe #16: Pumpkin Snickerdoodle Cookies

KING BAKER'S RECIPE #16: Pumpkin Snickerdoodle Cookies
Based on Cookies, Cupcakes, and Cardio Recipe


Fall is in the air! Pumpkin flavors are all around us! It's time for our first of many pumpkin recipe for the season!!! I love pumpkin. Anything with pumpkin I love. I also love snickerdoodles, as they are my favorite type of cookie. Putting them together, never came to my mind, until I saw this recipe! This is an amazingly delicious cookie. If you love Snickerdoodles or Pumpkin, than this is for you! 

The Equipment for both recipes you will need is:
1x Stand Mixer fitted with a Paddle Attachment/Large Bowl with Hand Beaters
1x Medium Bowl
1x Spatula
1x Cookie Scoop
2 Baking Sheets lined with Parchment Paper

Prep/Creation Time: 10 minutes
Baking Time: 10-14 minutes

Ingredients:

COOKIES:
3 3/4 CUP All-Purpose Flour
1 1/2 TSP Baking Powder
1/2 TSP Salt
1/2 TSP Ground Cinnamon
1 CUP (2 sticks) of room-temperature UNsalted butter
1 1/2 CUP Granulated Sugar
3/4 CUP Pure Pumpkin Puree
1 Large Egg
2 TSP Vanilla Extract

ROLLING SUGAR:
1/2 CUP Granulated Sugar
1 TSP Ground Cinnamon
1/4 TSP Ground Ginger
1/4 TSP Allspice

Procedures:

1) In your medium bowl, whisk together all of your flour, baking powder, salt, and ground cinnamon. Set aside

2) In large bowl, or the bowl of your stand mixer, cream the butter until it's light and fluffy.

3) Add Sugar and pumpkin puree. Blend well. While blending, add in your egg and vanilla extract. Make sure you scrape down the side of the bowl to blend well. 

4) Slowly, add in your dry ingredients into your wet ingredients until it's blended well. (What I did was used my 1/2 Measuring Cup and added it in using that.)

5) Split the dough in half and wrap both halves in plastic wrap. Set in the fridge for about an hour to chill. 

6) When it's time to bake, preheat your oven to 350 degrees F. Grab your Parchment paper lined baking sheets. 

7) In a small bowl for your rolling sugar, add in all the ingredients and mix well. 

8) Using you cookie scoop, scoop out some of the dough and roll into a ball. Roll each dough ball in the sugar and spice mixture and place on the cookie sheets. They should be 2 inches apart. DO THIS STEP!!! Using a glass with a nice flat bottom, or a small rolling pin, flatten the cookie balls.

9) Place in the oven and bake at 350 degrees F for 10-14 minutes. Afterwards, let them cool on the cookie sheet for 5 minutes then remove to wire rack. 

These cookies are a bit lighter than your normal Snickerdoodle cookies. They are slightly crunchy on the outside and crewy on the inside. A nice light touch of pumpkin and you are immediately in fall! ENJOY!!!!! 

HAPPY BAKING!

Sunday, September 7, 2014

King Baker's Recipe #15: Chocolate Cake in a Mug

KING BAKER'S RECIPE #15: Chocolate Cake in a MUG


Every once and a while, there will be nights where I am not wanting to bake at all, but crave the taste of something chocolately and cakey! So this recipe will help you on days or even a midnight snack, where you don't want to do any grand baking. This is a Chocolate Cake in a mug! This recipe taste so delicious and is very soft! 

The Equipment for both recipes you will need is:
1x Large Mug
1x Medium size bowl
1x Whisk
1x Spatula
Cooking Spray

Prep/Creation Time: 7-8 minutes
Cooking Time 1.30-1.45 minutes

Ingredients:
1 Egg
1/4 CUP White Granulated Sugar
1/4 TSP Salt
2 TBSP Unsweetened Cocoa Powder
1 TBSP Vegetable Oil
2 TBSP Melted Butter
1/8 TSP Vanilla Extract
3 TBSP Milk
1/4 CUP All Purpose Flour
1/4 TSP Baking Powder
GARNISH: Vanilla Ice Cream and Icing Sugar/Cocoa Powder

OPTIONAL INGREDIENTS* (If you want to make your chocolate cake special, add any of these ingredients):
1 or 2 TBSP Mini Semi-sweet Chocolate Chips
2 TBSP Toasted Sliced Almonds
1 TBSP Shredded Coconut

Procedures:

1) Melt your butter in a small bowl. Let it set out for a few minutes to cool.

HINT #1: It's a must to let your butter cool before stirring it in. You don't want to scramble the eggs.

2) In a medium sized bowl, place your sugar, egg, salt, cocoa powder, vanilla extract, and vegetable oil. Blend with a whisk until blended.

3) While stirring, slowly drizzle in the melted butter. Mix until combined.

4) Add in your milk and any of the optional ingredients. Blend well. Add in your flour and baking powder and mix until combined.

5) Spray your mug with cooking spray. Using a spatula, pour your mixture into the mug. Be sure to scrape all the batter in. Once complete, lightly tap the cup on the counter to get any air bubbles out.

6) Place in the microwave and cook, on high, for 1.30-1.45 minutes. When done, use a toothpick and poke it in the center. If it comes out clean, then it's done. The top may not look done, but trust me, it is.  Let cool!

7) To Garnish: Add a scoop of French Vanilla Ice Cream or Chocolate Frosting and lightly dust some Icing Sugar or Cocoa Powder to make it look pretty!

This literally takes under 10 minutes to put together. Once you try this recipe, this will only be your midnight snack!

HAPPY BAKING!

Saturday, September 6, 2014

King Baker's Recipe #14: Chocolate-Nut Pinwheel Cookies

KING BAKER'S RECIPE #14: Chocolate-Nut Pinwheel Cookies


These chocolatey, nutty pinwheel cookies will hypnotize you to eat them all!

The Equipment for both recipes you will need is:
1x Stand Mixer fitted with a Paddle Attachment/Large bowl
2x Cookie sheets lined with Parchment paper
1x Sharp Knife
1x Hand beaters (Use only for blending the dough with the cocoa powder)
Parchment/Wax Paper

Prep Time: 5 minutes
Baking Time 9-11 minutes

Ingredients:
2/3 CUP UNsalted Butter, softened
3/4 CUP White Granulated Sugar
1 Egg
1 TSP Vanilla Extract
1 3/4 CUPS All Purpose Flour
1/2 TSP Baking Powder
1/4 TSP Salt
1/3 CUPS Almond Flour/Almond Grounds
1/4 TSP Almond Extract
1/4 CUP Unsweetened Cocoa

Procedures:

1) Preheat your oven to 350 degrees F.

2) In the bowl of your stand mixer, fitted with the paddle attachment, Cream sugar, butter together. Add in your egg and blend well. Add in Vanilla Extract, baking powder, and salt. Blend well. Gradually add in the flour until it becomes a soft dough. Roll the dough into a ball and cut in half, evenly. (It is IMPORTANT That it is absolutely even)

3) Take one half of the dough and blend the ground almond/Almond flour and Almond Extract. Take the other half of the dough and blend in the cocoa powder using the hand beaters. (This will take a while to blend in completely.)

3) On a piece of parchment paper, roll both dough balls so that they are equal. You need to roll the dough into a rectangle about 1/4 inch thick. Place the rolled out cookie dough on a cookie sheet and place in the fridge for 30 minutes to chill.

4) Take out of the fridge. Place one of the cookie dough on the counter or workspace and place the other directly on top. Press lightly and peel away the top of the parchment paper. Now Jelly-roll style, slowly roll the cookie dough into a nice log shape. If it cracks, it is easily repairable, but just wait a minute for the dough to soften a little. Once you have it completely rolled up, wrap in parchment/wax paper and place on a cookie sheet and into the fridge for at least 4 Hours or overnight to set completely.

5) After setting, take out of the fridge. With a sharp knife, cut the cookie dough into thin cookies and place onto the cookie sheets lined with parchment paper. Place them about an inch apart. They don't spread that much.

6) Place in the oven at 350 degrees F for 9-11 minutes.

Let them cool after baking and you have your chocolate-nut pinwheel cookies! They are super nutty and chocolate and delicious. They are a crunchy cookie. They should be *slightly* brown.  ENJOY!!!!

HAPPY BAKING!

Thursday, September 4, 2014

King Baker's Recipe #13: Homemade Apple Sauce

KING BAKER'S RECIPE #13: Homemade Apple Sauce


Homemade Apple Sauce. This recipe is super simple and easy and a one pot dish! 

The Equipment for both recipes you will need is:
1x Medium Sauce Pan
1x Spatula
1x Potato Masher or Fork

Prep/Creation Time: 5 minutes

Ingredients:
5 Granny Smith Apples (Or Apple of your choice)
1/2 TSP Ground Cinnamon
1/2 TSP Orange Zest/Juice
1/2 CUP Apple Juice
1/4 CUP Brown Sugar

Procedures:

1) In a sauce pan and cook on medium heat for 30-40 or until the apples are tender.

HINT #1: Granny Smith apples are more firm, therefore takes longer to cook down. If you use Golden Delicious, Fuji Apples, etc. they will look less time, still equally delicious.

2) Take a potato masher or fork and mash down the apples. If you like it a bit more texture, don't mash as much.

Store in an air tight container for up to 2-3 weeks. This delicious dessert is perfect for a savory side dish, or served amazing with French Vanilla Ice Cream.

HAPPY BAKING!

King Baker's Recipe #12: Homemade Pumpkin Pie Spice

KING BAKER'S RECIPE #12: Homemade Pumpkin Spice


Are you a fan of pumpkin pie spice? Do you love Pumpkin Spice Latte from Starbucks? What about having that taste in any dessert or treat?! Well, look no more! We promised ourselves that when Starbucks starts selling PSL for this year, we would put out our own pumpkin pie spice blend! You can use this blend to make your own PSL, or use it for some of our upcoming recipes dealing with pumpkin and fall!

This recipe is quick and very easy! 

The Equipment for both recipes you will need is:
1x Small Bowl
1x Spoon
1x Container

Prep/Creation Time: 5 minutes

Ingredients:
1 TBSP Ground Cinnamon
1 1/2 TSP Ground Ginger
1/2 TSP Grated/Ground Nutmeg
1/2 TSP Ground Cloves
1/8 TSP Ground Allspice
1/8 TSP Salt

Procedures:

1) In a small bowl, place all your spices. Using your spoon, stir together your spices.

2) Place the spice mixture in a small container. Close the lid, shake the bottle until it's all mixed well.

There you have it! It's probably the simplest recipe there is. What I do, is I triple the ingredients (making 3 different batches, and combining them) So That I have some on hand when needed.