Sunday, October 26, 2014

King Baker's Recipe #28: Jack-O-Lantern Rice Crispy Balls

KING BAKER'S RECIPE #28: Jack-O-Lantern Rice Crispy Balls


With Halloween pumpkins popping around, it's time to grab some and start carving faces! But what if you could make some small jack-o-lanterns and completely edible? These treats will surely be your next favorite way to make Rice Crispy treats this halloween season.

The Equipment for both recipes you will need is:
1x Large Pot
1x Spatula
1x Parchment Paper lined baking sheets.

Prep Time: 10 Minutes
Cooking Time: 5-8 Minutes

Ingredients:
2 TBSP Unsalted Butter
1/8 TSP Salt
1 Package (10.5 oz) Mini Marshmallows
6 CUPS Rice Crispy Cereal
Orange Food Coloring
Tootsie Roll
Black Frosting or Pumpkin Face Candies
Baking Spray

Procedures:

1) In a large pot, melt your butter. After melted, pour your marshmallows and your salt. Constantly stir until it's fully melted.  Add in your orange food coloring.

2) Pour in your Rice Crispy Cereal. Stir until everything is covered in the marshmallow mixture. Pour into a large bowl. 

3) Spray your hand with baking spray or cover your hands with butter. Take a hand full of the rice crispy mixture in your hands and form them into a ball. 

4) Let it set for a few minutes.

5) Using the Tootsie Roll Candy, Cut it in half and flatten one end of the candy and place on top. Make it look like a pumpkin stem.

6) Using Black Frosting, Melting Chocolate, or Pumpkin Face Candies, Make a jack-o-lantern face. Be creative! 

Let Set and ENJOY! HAPPY HALLOWEEN!!!!

HAPPY BAKING!

Saturday, October 4, 2014

King Baker's Recipe #27: Monsters Inc. Eye Cookies

KING BAKER'S RECIPE #27: Monsters Inc. Eye Cookies


ROOOOOOOAAAARRRR!!!!!!! Bleep Bleep Bleep Bleep!........ DING! Ah, gotta love the sound of scarers doing their job. Looks like Mike and Sully have paid us a visit here in the kitchen to give us the best scare!

"We Scare Because We Care!"

The Equipment for both recipes you will need is:
1x Large Bowl/Stand Mixer
1x Spatula
3x Bowls
3x Spoons and 3x Knifes
1x-2x Backing Sheet, lined with Parchment Paper

Prep Time: 30-40 Minutes
Cooking Time: 11-13 Minutes

Ingredients:
1 CUP Butter
1 1/2 CUP Granulated Sugar
2 Large Eggs
2 3/4 CUP Flour
2 TSP Cream of Tartar
1 TSP Baking Soda
1 TSP Vanilla Extract
1/2 TSP Salt
Green, Blue and Purple Food Coloring
Large and Small Wilton Eye Candy

Procedures:

1) Prepare your baking sheet with parchment paper and Preheat your oven to 350 degrees F.

2) In a separate bowl, place your flour, salt, baking soda and cream of tartar and mix together.

3) In a large bowl or the bowl of your stand mixer, fitted with the paddle attachment, cream together your butter, sugar, and eggs.

4) Gradually, add your dry ingredients in with your wet ingredients.

5) Separate the dough into 3 dough balls. Wrap in plastic wrap and set in the fridge to chill or the freezer for less time. Afterwards, take out and either knead with flour or mix with a spoon/knife the colors green, blue, and purple.

6) Roll the dough into 3/4" dough balls. Green one needs to stay green. Combine pieces of Blue and Purple to make one dough ball.

*7) This is optional, roll each dough ball in sugar.

8) Bake in the oven for 11-13 minutes. Immediately after taken out of the oven, place in a single large eye candy for the Green (Mike) and two small eyes for the purple and blue cookie (Sulley).

Let cool and ENJOY!

HAPPY BAKING!

Thursday, October 2, 2014

King Baker's Recipe #26: Halloween Trick 'r Treat Chocolate Bark

KING BAKER'S RECIPE #26: Halloween Trick 'r Treat Chocolate Bark


The Equipment for both recipes you will need is:
3x-4x Microwaveable Bowls and Plastic Spoon
1x Baking Sheet lined with Parchment Paper
1x Knife

Prep Time: 20-25 Minutes
Cooling Time: 1-2 Hours

This recipe I used Dark Chocolate, Orange and Green Wilton Candy Melts.

Ingredients:
(REMINDER: You can use any color candy melts you want!)
2 CUP Dark Chocolate Candy Melts
1 CUP Green Candy Melts
1 CUP Orange Candy Melts
Assortment of Candy (Candy Corn, M&Ms, Nuts, or any candy)


Procedures:

1) Prepare your baking sheet with parchment paper.

2) Place each color candy melts in a different bowl. Microwave the melts in 30 second busts until it's smooth. Add vegetable oil to make it more smooth. 

3) Pour your main color on your baking sheet and spread until thin. Then sporadically place your other colors around the main color. 

4) Using your knife, swirl the colors around to make a marbling effect. 

5) Lightly, tap the entire tray on the counter to smooth it out and get rid of any air bubbles. Again, sporadically place your candies or nuts that you want all over the bar. 

6) Place in the fridge to set for at least an hour. Break a part in whatever size pieces you want. ENJOY!!!

HAPPY BAKING!

Sunday, September 28, 2014

King Baker's Recipe #25: Homemade Vanilla Buttercream Icing

KING BAKER'S RECIPE #25: Homemade Vanilla Buttercream Icing


Homemade Vanilla Buttercream Icing! Perfect for any cake or cookie decorating! this recipe can be adapted to any special occasion! You can color it or add flavoring to make each cake special! 

The Equipment for both recipes you will need is:
1x Stand Mixer with Paddle Attachment. (Or a large bowl with a whisk.)
1x Spatula

Prep Time: 10 Minutes

Ingredients:
1/2 CUP (1 Stick) Unsalted Butter, at room temperature
3 CUP Icing Sugar
2 TSP Vanilla Extract
2-4 TBSP Milk

Procedures:

1) In your large bowl, add your butter. Whip it until it's creamy and fluffy.

2) Add about half of your icing sugar and mix slowly and carefully. Add in your vanilla extract and gradually add in your milk a tablespoon at a time. (I start out with 2 TBSP) After mixing, make sure you scrape the bottom of the bowl.

3) Add in your remainder of your icing sugar. Add in your milk a tablespoon at a time until it's smooth and *slightly* think. Just make sure it's not too runny.

After you've reached your desired consistency, you can icing your cake, or you can place in a piping bag and design your cake like crazy! To make this special, add coloring or flavor to it to make it themed to whatever the special occasion is! ENJOY!

HAPPY BAKING!

Saturday, September 27, 2014

King Baker's Recipe #24: Homemade Vanilla Cake

KING BAKER'S RECIPE #24: Homemade Vanilla Cake


Homemade Vanilla Cake! This is the perfect recipe or any cake you like to make. You can fill any molds or bake it plain and decorated however you want. This is just a basic recipe and easy to put together. You can also replace a few items to make it special and add color! 

The Equipment for both recipes you will need is:
Any type of baking bold you like. (EX: Bundt Mold, 9x13, 8x8 round or square or anything.)
1x Stand Mixer with Paddle Attachment. (Or a large bowl with a whisk.
1x Spatula

Prep Time: 20 Minutes
Cooking Time: 30-35 Minutes

Ingredients:
Vanilla Cake:
2 1/4 CUP All-Purpose Flour
3 TSP Baking Powder
1 1/3 CUP Granulated Sugar
1/2 TSP Salt
1/2 CUP (1 Stick) Unsalted Butter
1 CUP Milk
1 TSP Vanilla Extract
2 Large Eggs

Procedures:

1) Preheat your oven to 350 degrees F.

2) In your large bowl, or the bowl of the stand mixer fitted with a paddle attachment, place your flour, sugar, salt, baking powder and mix until combined.

3) Cut your butter into small cubes and slowly place the butter in the bowl, with the mixer running. The end texture should be size of peas and/or grainy

4) Add in your Vanilla Extract and slowly add in your milk. Add these ingredients while the mixture is on slow. Scrape the sides and the bottom of the bowl. Continue mixing.

5) One at a time, add in your eggs into your mixture. Stop the mixture and scrape the bowl. Mix until it's fully combined.

6) There are a few ways to fix your baking molds or pans for it to be ready for baking. If you are using a regular rectangle, square, or circle pan, you need line the bottom with parchment paper and spray the sides with cooking spray. If you are using something like a character mold, you need to spray the pan/mold really well with cooking spray.

7) Pour your cake into the pan/mold. Tap on the counter to get any air bubbles out and smooth the top.

8) Place in the oven at 350 degrees F for 30-35 minutes. You can tell it's done by sticking a tooth pick in the center and it should come out clean with no wet batter on it.

Like I said, this cake is for your basic cake for parties or special events. You can totally replace certain ingredients to make it special and you can also make it colored for special occasion! You all have imaginations, use them! :) ENJOY!!!

HAPPY BAKING!

Thursday, September 25, 2014

King Baker's Recipe #23: Pumpkin Pancakes

KING BAKER'S RECIPE #23: Pumpkin Pancakes


Since fall is upon us, what better way to have a good and delicious breakfast than with PUMPKIN PANCAKES! They are simple to make and very good! Drizzle our Pumpkin Syrup over it and it will just be divine! 

The Equipment for both recipes you will need is:
1x Griddle or Large Non stick skillet
1x Whisk
1x Spatula
1x 1/4 Measuring cup
1x Large Bowl
1x Medium Bowl

Prep Time: 10 Minutes
Cooking Time: 2-3 minutes on each side

Ingredients:
1 CUP All Purpose Flour
1 TBSP Brown Sugar
1 TBSP Granulated Sugar
1/2 TSP Baking Soda
1 TSP Pumpkin Pie Spice
1/2 TSP Salt
1/2 CUP Evaporated Milk
1/4 CUP Water
1 Large Egg
1 TBSP Vegetable Oil
1/2 CUP Pure Pumpkin Puree


Procedures:

1) Preheat your skillet or griddle over medium heat and spray with non-stick cooking spray.

2) In a large bowl, combine all your dry ingredients. Flour, baking soda, salt, and pumpkin pie spice. Set aside.

3) In a medium bowl, whisk together your wet ingredients. Both sugars, Evaporated Milk, Water, Egg, Vegetable Oil, and Pumpkin Puree.

4) In the Large bowl, add your wet ingredients into the dry ingredients. Whisk until just combined.

5) Using your 1/4 Cup measuring cup, pour your pancake batter on the preheated and greased griddle or skillet.

6) Cook for about 2-3 minutes on each side or until cooked through.

7) Serve warm and drizzle any type of syrup on top. Our Pumpkin Spice Syrup goes GREAT with these pancakes. Also serve with some toasted nuts or seeds.

This is bound to be your favorite fall breakfast meal. ENJOY!

HAPPY BAKING!

King Baker's Recipe #22: Pumpkin Spice Syrup

KING BAKER'S RECIPE #22: Pumpkin Spice Syrup


The Equipment for both recipes you will need is:
1x Large Bowl
1x Whisk
1x Spatula
1x Pipping Bag
1x Glass container with a lid and a spout.


Prep Time: 15 Minutes
Cooking Time: 2-4 Minutes

Ingredients:
2 TBSP Unsalted Butter
1/2 CUP Light Brown Sugar
1/2 CUP Honey
2/3 CUP Water
2 TBSP All-Purpose Flour
1/2 TSP Pumpkin Pie Spice (You can find the recipe on my blog!)

Procedures:

1) In your large microwaveable safe bowl, combine flour and pumpkin spice.

2) Add in the water and whisk together until well combined and no lumps.

3) Add the brown sugar and honey and whisk together.

4) Microwave on high for 1-2 minutes then stir. Continue to heat the mixture for about 30 seconds to 1 minute intervals. Heat until the mixture is thickened. The mixture will begin to boil and bubble up, so that is why you need the large bowl. The bowl and mixture will be very hot, so handle with caution. Using pot holders, take the bowl out of the  microwave.

5) Add the butter to the hot mixture and mix until the butter is incorporated and melted.

6) Place the mixture into your glass container and let cool completely. Place in the fridge for storage.

Drizzle over some warm pumpkin pancakes or the pumpkin cookies we posted last week!

HAPPY BAKING!

Sunday, September 21, 2014

King Baker's Recipe #21: Pumpkin Cookies

KING BAKER'S RECIPE #21: Pumpkin Cookies


FALL HAS ARRIVED!!!! Today is officially the first day of fall! Time to bring out the apple and pumpkin recipes! This one is a delicious, soft cookie treat that will surely get you into the fall spirit! 

The Equipment for both recipes you will need is:
1x Stand Mixer or Large Bowl
1x Medium Sized Bowl
1x Spatula
1x Cookie Scoop
1x-2x Baking Sheets lined with Parchment Paper
1 Pipping bag or a cup with a spout.

Prep Time: 10 Minutes
Cooking Time: 15 Minutes

Ingredients:
COOKIE:
2 1/2 CUP All Purpose Flour
1 CUP Pure Pumpkin Puree
1 Large Egg
1 CUP Granulated Sugar
2 TSP Pumpkin Pie Spice
1/2 CUP Brown Sugar
1/2 CUP (1 Stick) UNsalted butter, softened
1 TSP Vanilla Extract
1 TSP Baking Powder
1 TSP Baking Soda
1/2 TSP Salt

GLAZE:
The Recipe will be coming out this Wednesday, September 24.

Procedures:

1) Preheat oven to 350 degrees F and line your baking sheets with parchment paper.

2) In a medium sized bowl, combine flour, baking powder, baking soda, salt, and pumpkin pie spice. Set aside.

3) In the bowl of a standing mixer fitted with a paddle attachment, cream together both granulated sugar and brown sugar with your butter. Add in your egg, pumpkin puree, and vanilla. Blend well.

4) Add the dry ingredients and mix until well blended. Make sure you scrape the bottom of the bowl.

5) Using your cookie scoop, scoop out your dough and place them on the parchment lined baking sheets. Place them about 2 inches apart. Flatten the dough balls lightly with your fingers.

6) Bake the cookies at 350 degrees F for 14-16 minutes or until lightly golden brown around the edges. Let them cool completely.

7) Drizzle your homemade glaze over the cookies and allow to set. ENJOY!!!!!

HAPPY BAKING!

King Baker's Recipe #20: S'more Cookie Cups!

KING BAKER'S RECIPE #20: S'more Cookie Cups
Inspired by Laura in the Kitchen


With the last day of summer, Here is a recipe to celebrate the great summer of 2014! S'more Cookie Cups! 

The Equipment for both recipes you will need is:
1x Stand mixer fitted with the paddle attachment or Large Bowl.
1x Medium Sized Bowl
1x Spatula
1x Cookie Scoop
1x Mini Muffin Baking Sheet
1x Small Rolling Pin

Prep Time: 20 Minutes
Cooking Time: 10 Minutes

Ingredients:
1 1/3 CUP All Purpose Flour
1 1/4 CUP Crushed Graham Crackers
1/2 TSP Salt
1/2 TSP Baking Soda
1 Egg
1 TSP Vanilla Extract
1/2 CUP Unsalted Butter softened at room temperature
1/3 CUP Granulated Sugar
1/3 CUP of Brown Sugar
1/4 CUP Grated Chocolate, optional
Mini Marshmallows
Hershey's Kisses

Procedures:

1) Preheat oven to 375 degrees F.

2) In a bowl, mix together the flour, grated chocolate, salt, baking soda and crushed graham crackers, set aside.

3) In the bowl of a standing mixer fitted with a paddle attachment, cream together the butter with both kinds of sugar, add the egg and vanilla and mix until combined.

4) Add the dry ingredients and mix until your dough has come together.

5) Using a tablespoon or a small ice cream scoop (about the size of one tablespoon) drop the dough into your prepared mini muffin tin.

6) Press the dough into each little muffin cup using a spoon or anything that will make an indent or a well in the center.

7) Bake them at 375 degrees F for about 6 to 8 minutes or until lightly golden brown around the edges, remove from the oven and turn your oven on to broil. When taking out, use your rolling pin to repress in that indent or well as it will have puffed up in the oven a little bit.

8) Place a Hershey's Kisses at the bottom of each cookie cup followed by a few mini marshmallows and pop them under the broiler just for about a minute or until the marshmallows start to lightly brown.

9) Remove from the oven and immediately top them with another little piece of chocolate. Allow to cool slightly before removing from the tin and serving them. ENJOY!!!!!!!

HAPPY BAKING!

Wednesday, September 17, 2014

King Baker's Recipe #19: Apple Pie Fudge

KING BAKER'S RECIPE #19: Apple Pie Fudge


This apple pie fudge is so delicious and you can taste the apple pie clearly!


The Equipment for both recipes you will need is:
1x Stand Mixer fitted with the WHISK attachment (Or A LARGE mixing bowl with a large spatula)
1x Large Heavy-bottomed pot
1x-2x 8 inch baking pans
1x Spatula
Foil Paper

Prep Time: 8 minutes
Cooking Time: 8-12 minutes
Setting Time: 3-4 Hours

Ingredients:
3 CUP White Granulated Sugar
3/4 CUP Unsalted Butter
1/4 TSP Salt
1 CUP Heavy Cream (or Milk)
1 TSP Cinnamon
1/2 TSP Nutmeg
1/4 TSP Allspice
1/2 CUP of Apple Pie Filling (Or you can use my Homemade Apple Sauce for this recipe. Works amazing!)
3 CUPS White Chocolate Chips

Procedures:

1) In your large mixing bowl of your stand mixer fitted with a whisk attachment, place your white chocolate and Apple Pie Filling (or Sauce) in the bowl. 

2) In a large heavy-bottomed pot, place your unsalted butter, sugar, heavy cream, salt, cinnamon, nutmeg, and allspice in. Over medium heat constantly stir the mixture until butter melts and blended well. Bring to a boil and cook for an additional 4 Minutes. Don't forget to constantly stir until the 4 minutes of boiling is up.

3) After boiling, pour hot mixer in the large mixing bowl with the chocolate and apple pie filling. Start stirring until the mixture is blended well and smooth.

4) Take 1 or 2 baking pans, line them with foil and spray well with cooking spray. Carefully pour the mixture in each baking pan and smooth it out.

5) Place in the fridge for 3-4 hours and garnish with some Cinnamon Snap Cookies or Cinnamon Apple Chips! ENJOY!!!!!

This fudge has a surprising apple pie flavor that you don't normally get in fudge. It is very very sweet though, so a little go a long way! 

HAPPY BAKING!

Sunday, September 14, 2014

King Baker's Recipe #18: Homemade Mixed Berry Jam

KING BAKER'S RECIPE #18: Homemade Mixed Berry Jam


With summer coming to a close, I still want to treasure the smells and tastes of summer. I am a huge lover of fresh berries. I buy so much that I end up not knowing what to do with them. This recipe is for any type of berry. Perfect jam to spread on some toast, or make a tart or many other things.

The Equipment for both recipes you will need is:
1x Large Pot (A large pasta pot will work)
1x Large Heavy-bottom pot
1x Large Glass cup with a spout and a handle
1x Wooden Spoon
3x-4x Mason Jars with Lids and twist lids.
1x Thongs or grabbing equipment
1x Baking Sheet lined with a Towel
1x Potato Masher

Prep Time: 20 minutes
Cooking Time: 30-45 minutes and 20 minutes extra

Ingredients:
1 POUND of Strawberries
1/2 POUND of Blueberries
1/2 POUND of Raspberries
1 1/2 CUP White Granulated Sugar
1/2 Lemon
1/4 TSP Salt


Procedures:

1) In your large Pasta Pot, Place your jars and lids, off the jars, in the pot. Fill it with hot water until it is about an inch above the jars. Bring to a boil. (It bubbles appear on the jar, then it will be fine. Mine never comes to a roaring boil, but bubbles form and you are just sterilizing the jars.)

2) Make sure you wash your strawberries, pat dry and cut into small pieces. Wash your blueberries and pat dry and place with the strawberries in a separate bowl. Just place raspberries in the bowl with the other fruit without washing them.

3) In a large heavy bottomed pot, place all your berries, sugar, lemon juice,  and salt. Turn stove on medium high and stir. Blend the berries and sugar mixture well. Bring to a boil and cook until it becomes thick and jam like. Should take anywhere between 30-45 minutes. If it starts over boiling and splatters everywhere, turn the stove off for 30 seconds and turn on medium-low.

4) After it's done, using your tongs or any grabbing equipment, take the jars and lids out of the boiling water and place on the baking sheet lined with a towel. 

5) Take your jam mixture and place it in the large cup with a spout. Slowly pour the jam into the jars leaving about 1/2 inch from the top. Place the lid on the jar and screw the second lid on, but don't screw it on tight. Screw it on just tight enough so that water doesn't get into the jars.

6) Place the jars back into the water and let them sit for 20 minutes EXACTLY.  No more, no less.

7) Take the jars out and place them back on the baking sheet. Screw the lids on as tight as they will go as soon as they come out of the water. Let them set out on a flat surface for over night. You may hear popping coming from the lids. THAT IS GOOD!!  You want the lids to pop. That means you've placed the lid and did it right. If one doesn't pop, then you need to use that jam first. That's why you need to let them set out over night. 

This Jam recipe is easy to double up to make more jam. Plus you can freeze the jam and it keeps really well! ENJOY!!!! 

HAPPY BAKING!

Saturday, September 13, 2014

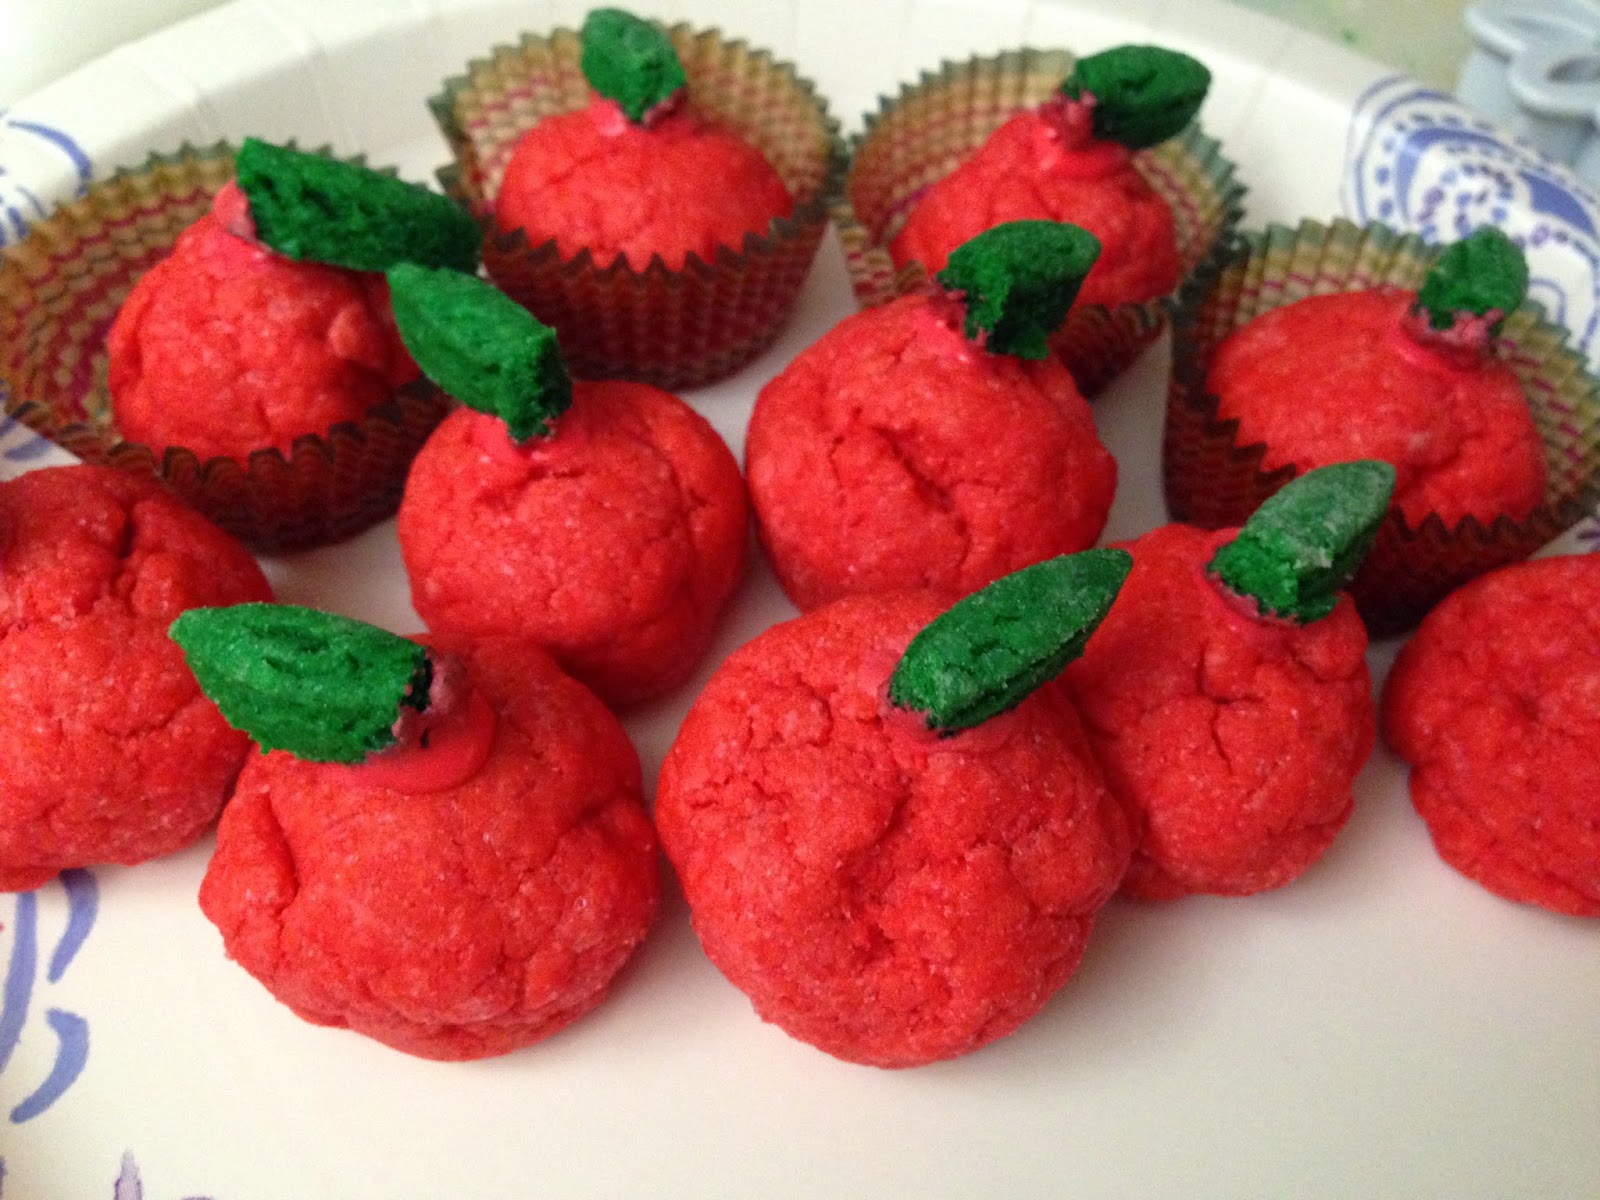
King Baker's Recipe #17: Back-to-School Teacher's Apple Cookies

KING BAKER'S RECIPE #17: Back-to-School Teacher's Apple Cookies


September. That means everyone is back in school! All the stress of homework and teachers and friends makes each year exciting! A tradition is to give a teacher an Apple before the day starts. How about trying something new? Make these delicious Teacher's Apple Cookies! They are simple to make and fun for the teacher! 

The Equipment for both recipes you will need is:
1x Mini Muffin Pan (or Large Muffin Pan for large apples)
Mini or Large Muffin Liners
1x Bowl (or Stand Mixer fitted with the paddle attachment)
Leaf or Flower Cookie Cutters
1x Baking sheet
Parchment paper

Prep Time: 20 Minutes
Baking Time 10 Minutes and 18 Minutes

Ingredients:
1 1/2 CUP All Purpose Flour
1/4 TSP Baking Powder
1/2 CUP Unsalted Butter
1/2 CUP Sugar
1 Large Egg, lightly beaten
1/2 TSP Vanilla Extract
1/4 TSP Salt
Red and Green Food Gel Paste
Pretzel sticks
Red Royal Icing

Procedures:

1) Preheat your oven to 350 degrees F.

2) In the bowl of your stand mixer, fitted with the paddle attachment, cream butter and sugar until lightly fluffy.

3) Add in your egg and vanilla and blend well. Add all your dry ingredients, slowly until mixed well.

4) Turn onto the counter and knead the dough until it comes to a ball. If the dough ball is sticky, place in the fridge to chill.

5) Separate the dough by 3rds. Take 2/3 of the dough and form into a large ball. The larger of  dough ball, dye it red. Dye the smaller dough ball green.

6) Take a small portion of the red dough and roll it into balls. Place them in the mini muffin pan lined with liners. Roll out the green dough until it's 1/4 inch. Take a leaf or flour cutter and cut out some leaves or flowers. Place on a baking sheet lined with parchment paper

7) Place both the red dough balls and the leaves/flowers in the oven. Bake in the oven on 350 degrees F, the Red dough balls for 18 minutes and the leaves/flowers for 10 minutes.

8) After they are taken out, cut the peddles off the flower cookies if you used flower cutters. These will act as the leaves on the apple. As soon as the Apple cookie comes out, immediately place a pretzel stick in the center while they are still hot.

9) Take the apple cookies and lightly, and smally brush on some royal icing and place the leaves on the cookie. Let set and ENJOY!!!!!

HAPPY BAKING!

Wednesday, September 10, 2014

King Baker's Recipe #16: Pumpkin Snickerdoodle Cookies

KING BAKER'S RECIPE #16: Pumpkin Snickerdoodle Cookies
Based on Cookies, Cupcakes, and Cardio Recipe


Fall is in the air! Pumpkin flavors are all around us! It's time for our first of many pumpkin recipe for the season!!! I love pumpkin. Anything with pumpkin I love. I also love snickerdoodles, as they are my favorite type of cookie. Putting them together, never came to my mind, until I saw this recipe! This is an amazingly delicious cookie. If you love Snickerdoodles or Pumpkin, than this is for you! 

The Equipment for both recipes you will need is:
1x Stand Mixer fitted with a Paddle Attachment/Large Bowl with Hand Beaters
1x Medium Bowl
1x Spatula
1x Cookie Scoop
2 Baking Sheets lined with Parchment Paper

Prep/Creation Time: 10 minutes
Baking Time: 10-14 minutes

Ingredients:

COOKIES:
3 3/4 CUP All-Purpose Flour
1 1/2 TSP Baking Powder
1/2 TSP Salt
1/2 TSP Ground Cinnamon
1 CUP (2 sticks) of room-temperature UNsalted butter
1 1/2 CUP Granulated Sugar
3/4 CUP Pure Pumpkin Puree
1 Large Egg
2 TSP Vanilla Extract

ROLLING SUGAR:
1/2 CUP Granulated Sugar
1 TSP Ground Cinnamon
1/4 TSP Ground Ginger
1/4 TSP Allspice

Procedures:

1) In your medium bowl, whisk together all of your flour, baking powder, salt, and ground cinnamon. Set aside

2) In large bowl, or the bowl of your stand mixer, cream the butter until it's light and fluffy.

3) Add Sugar and pumpkin puree. Blend well. While blending, add in your egg and vanilla extract. Make sure you scrape down the side of the bowl to blend well. 

4) Slowly, add in your dry ingredients into your wet ingredients until it's blended well. (What I did was used my 1/2 Measuring Cup and added it in using that.)

5) Split the dough in half and wrap both halves in plastic wrap. Set in the fridge for about an hour to chill. 

6) When it's time to bake, preheat your oven to 350 degrees F. Grab your Parchment paper lined baking sheets. 

7) In a small bowl for your rolling sugar, add in all the ingredients and mix well. 

8) Using you cookie scoop, scoop out some of the dough and roll into a ball. Roll each dough ball in the sugar and spice mixture and place on the cookie sheets. They should be 2 inches apart. DO THIS STEP!!! Using a glass with a nice flat bottom, or a small rolling pin, flatten the cookie balls.

9) Place in the oven and bake at 350 degrees F for 10-14 minutes. Afterwards, let them cool on the cookie sheet for 5 minutes then remove to wire rack. 

These cookies are a bit lighter than your normal Snickerdoodle cookies. They are slightly crunchy on the outside and crewy on the inside. A nice light touch of pumpkin and you are immediately in fall! ENJOY!!!!! 

HAPPY BAKING!

Sunday, September 7, 2014

King Baker's Recipe #15: Chocolate Cake in a Mug

KING BAKER'S RECIPE #15: Chocolate Cake in a MUG


Every once and a while, there will be nights where I am not wanting to bake at all, but crave the taste of something chocolately and cakey! So this recipe will help you on days or even a midnight snack, where you don't want to do any grand baking. This is a Chocolate Cake in a mug! This recipe taste so delicious and is very soft! 

The Equipment for both recipes you will need is:
1x Large Mug
1x Medium size bowl
1x Whisk
1x Spatula
Cooking Spray

Prep/Creation Time: 7-8 minutes
Cooking Time 1.30-1.45 minutes

Ingredients:
1 Egg
1/4 CUP White Granulated Sugar
1/4 TSP Salt
2 TBSP Unsweetened Cocoa Powder
1 TBSP Vegetable Oil
2 TBSP Melted Butter
1/8 TSP Vanilla Extract
3 TBSP Milk
1/4 CUP All Purpose Flour
1/4 TSP Baking Powder
GARNISH: Vanilla Ice Cream and Icing Sugar/Cocoa Powder

OPTIONAL INGREDIENTS* (If you want to make your chocolate cake special, add any of these ingredients):
1 or 2 TBSP Mini Semi-sweet Chocolate Chips
2 TBSP Toasted Sliced Almonds
1 TBSP Shredded Coconut

Procedures:

1) Melt your butter in a small bowl. Let it set out for a few minutes to cool.

HINT #1: It's a must to let your butter cool before stirring it in. You don't want to scramble the eggs.

2) In a medium sized bowl, place your sugar, egg, salt, cocoa powder, vanilla extract, and vegetable oil. Blend with a whisk until blended.

3) While stirring, slowly drizzle in the melted butter. Mix until combined.

4) Add in your milk and any of the optional ingredients. Blend well. Add in your flour and baking powder and mix until combined.

5) Spray your mug with cooking spray. Using a spatula, pour your mixture into the mug. Be sure to scrape all the batter in. Once complete, lightly tap the cup on the counter to get any air bubbles out.

6) Place in the microwave and cook, on high, for 1.30-1.45 minutes. When done, use a toothpick and poke it in the center. If it comes out clean, then it's done. The top may not look done, but trust me, it is.  Let cool!

7) To Garnish: Add a scoop of French Vanilla Ice Cream or Chocolate Frosting and lightly dust some Icing Sugar or Cocoa Powder to make it look pretty!

This literally takes under 10 minutes to put together. Once you try this recipe, this will only be your midnight snack!

HAPPY BAKING!

Saturday, September 6, 2014

King Baker's Recipe #14: Chocolate-Nut Pinwheel Cookies

KING BAKER'S RECIPE #14: Chocolate-Nut Pinwheel Cookies


These chocolatey, nutty pinwheel cookies will hypnotize you to eat them all!

The Equipment for both recipes you will need is:
1x Stand Mixer fitted with a Paddle Attachment/Large bowl
2x Cookie sheets lined with Parchment paper
1x Sharp Knife
1x Hand beaters (Use only for blending the dough with the cocoa powder)
Parchment/Wax Paper

Prep Time: 5 minutes
Baking Time 9-11 minutes

Ingredients:
2/3 CUP UNsalted Butter, softened
3/4 CUP White Granulated Sugar
1 Egg
1 TSP Vanilla Extract
1 3/4 CUPS All Purpose Flour
1/2 TSP Baking Powder
1/4 TSP Salt
1/3 CUPS Almond Flour/Almond Grounds
1/4 TSP Almond Extract
1/4 CUP Unsweetened Cocoa

Procedures:

1) Preheat your oven to 350 degrees F.

2) In the bowl of your stand mixer, fitted with the paddle attachment, Cream sugar, butter together. Add in your egg and blend well. Add in Vanilla Extract, baking powder, and salt. Blend well. Gradually add in the flour until it becomes a soft dough. Roll the dough into a ball and cut in half, evenly. (It is IMPORTANT That it is absolutely even)

3) Take one half of the dough and blend the ground almond/Almond flour and Almond Extract. Take the other half of the dough and blend in the cocoa powder using the hand beaters. (This will take a while to blend in completely.)

3) On a piece of parchment paper, roll both dough balls so that they are equal. You need to roll the dough into a rectangle about 1/4 inch thick. Place the rolled out cookie dough on a cookie sheet and place in the fridge for 30 minutes to chill.

4) Take out of the fridge. Place one of the cookie dough on the counter or workspace and place the other directly on top. Press lightly and peel away the top of the parchment paper. Now Jelly-roll style, slowly roll the cookie dough into a nice log shape. If it cracks, it is easily repairable, but just wait a minute for the dough to soften a little. Once you have it completely rolled up, wrap in parchment/wax paper and place on a cookie sheet and into the fridge for at least 4 Hours or overnight to set completely.

5) After setting, take out of the fridge. With a sharp knife, cut the cookie dough into thin cookies and place onto the cookie sheets lined with parchment paper. Place them about an inch apart. They don't spread that much.

6) Place in the oven at 350 degrees F for 9-11 minutes.

Let them cool after baking and you have your chocolate-nut pinwheel cookies! They are super nutty and chocolate and delicious. They are a crunchy cookie. They should be *slightly* brown.  ENJOY!!!!

HAPPY BAKING!

Thursday, September 4, 2014

King Baker's Recipe #13: Homemade Apple Sauce

KING BAKER'S RECIPE #13: Homemade Apple Sauce


Homemade Apple Sauce. This recipe is super simple and easy and a one pot dish! 

The Equipment for both recipes you will need is:
1x Medium Sauce Pan
1x Spatula
1x Potato Masher or Fork

Prep/Creation Time: 5 minutes

Ingredients:
5 Granny Smith Apples (Or Apple of your choice)
1/2 TSP Ground Cinnamon
1/2 TSP Orange Zest/Juice
1/2 CUP Apple Juice
1/4 CUP Brown Sugar

Procedures:

1) In a sauce pan and cook on medium heat for 30-40 or until the apples are tender.

HINT #1: Granny Smith apples are more firm, therefore takes longer to cook down. If you use Golden Delicious, Fuji Apples, etc. they will look less time, still equally delicious.

2) Take a potato masher or fork and mash down the apples. If you like it a bit more texture, don't mash as much.

Store in an air tight container for up to 2-3 weeks. This delicious dessert is perfect for a savory side dish, or served amazing with French Vanilla Ice Cream.

HAPPY BAKING!

King Baker's Recipe #12: Homemade Pumpkin Pie Spice

KING BAKER'S RECIPE #12: Homemade Pumpkin Spice


Are you a fan of pumpkin pie spice? Do you love Pumpkin Spice Latte from Starbucks? What about having that taste in any dessert or treat?! Well, look no more! We promised ourselves that when Starbucks starts selling PSL for this year, we would put out our own pumpkin pie spice blend! You can use this blend to make your own PSL, or use it for some of our upcoming recipes dealing with pumpkin and fall!

This recipe is quick and very easy! 

The Equipment for both recipes you will need is:
1x Small Bowl
1x Spoon
1x Container

Prep/Creation Time: 5 minutes

Ingredients:
1 TBSP Ground Cinnamon
1 1/2 TSP Ground Ginger
1/2 TSP Grated/Ground Nutmeg
1/2 TSP Ground Cloves
1/8 TSP Ground Allspice
1/8 TSP Salt

Procedures:

1) In a small bowl, place all your spices. Using your spoon, stir together your spices.

2) Place the spice mixture in a small container. Close the lid, shake the bottle until it's all mixed well.

There you have it! It's probably the simplest recipe there is. What I do, is I triple the ingredients (making 3 different batches, and combining them) So That I have some on hand when needed.


Sunday, August 31, 2014

King Baker's Recipe #10 and #11: Marshmallow Fluff and Marshmallow Buttercream

KING BAKER'S RECIPE #10 and #11: MARSHMALLOW FLUFF AND MARSHMALLOW BUTTERCREAM
Recipe by Jenn from Cookies, Cupcakes and Cardio


Do you like Marshmallows? Do you like Marshmallow topping on any yummy treat? What about a marshmallow buttercream to top your cupcakes or cakes? These recipes are for you! Homemade Marshmallow Fluff and Marshmallow Buttercream is the perfect way top top off any special treat! 

The Equipment for both recipes you will need is:
1x Large Bowls with Hand Beaters (Stand Mixer is preferred)
1x Spatulas

Prep/Creation Time: 10 minutes for each recipe.

Ingredients:

Marshmallow Fluff:
3 egg whites, at room temperature
2 cups light corn syrup
1/2 teaspoon salt
2 cups icing sugar
1 tablespoon vanilla extract

Marshmallow Buttercream:
• 2 cups butter, softened
• 2 1/2 cups icing sugar
• 1 teaspoon almond extract
• 14 ounces marshmallow fluff/creme (or one jar)

Procedures:

Marshmallow Fluff:

1) In the bowl of your stand mixer fitted with a whisk attackment, place your egg whites, light corn syrup, and salt. Whip the mixture until it's a glossy white and doubled in volume.

2) Add in your vanilla extract and icing sugar in 3rds. Mix until it's well blended.

Store in a container for a week or two.

Marshmallow Buttercream:

1) In your bowl of your stand mixer, fitted with a paddle attachment, place your butter and blend until creamy.

2) Pour in your icing sugar and blend together until smooth. Add almond extract and blend until smooth.

3) Add in your marshmallow fluff and mix until creamy.

4) OPTIONAL: Add food coloring until nicely incorporated.

Store in a contain for up to 4-5 days. Before use, place out at room temperature.

Happy Baking!

Saturday, August 30, 2014

King Baker's Recipe #9: Super S'more Cupcakes

KING BAKER'S RECIPE #9: SUPER S'MORE CUPCAKES


We all know that summer is coming to a close. With schools across the country starting and fall in the air, what better way to celebrate the end of summer with a classic summer treat revamped! 

King Baker's Confectionery is proud to introduce, SUPER S'MORE CUPCAKES! These decadent, delicious, and rich treat will fill your s'more appetite and a perfect way to celebrate summer! Although this treat is called a cupcake, there isn't any cake at all. A Graham cracker base, filled milk chocolate fudge, topped with Marshmallow buttercream. What could be better!?

The Equipment you will need is:
2x Medium Bowls
1x 12 Cupcake Tray and Cupcake Liners
2x Spatulas
Pipping Bags and Pipping Tips


Prep/Creation Time: 20-25 minutes
Baking time: 10 minutes


Ingredients:

Graham Cracker Crust:
2 CUPS of Graham Cracker crumbs
1/4 CUP Granulated Sugar
1/4 TSP Salt
1/2 CUP (1 stick) Melted Butter

Milk Chocolate Fudge:
7 oz Sweetened and Condensed Milk
7 oz Milk Chocolate
3.5 TBSP Butter

Marshmallow Buttercream:
RECIPE WILL COME OUT TOMORROW August 31st!!! ;)

Procedures:

1) Preheat your oven to 350 F

To make the Graham Cracker Crust:

2) Take some graham crackers and ground it up using a mallet, or a food processor.

3) In a medium size bowl, place your graham cracker crumbs, sugar, salt, and melted butter and stir until it's crumbly, but comes together when pinched.

4) Take your cupcake try that is lined with cupcake liners, and place a little bit of the crumb mixture in each liner. Press the crust until it's thin and goes up the sides.

HINT #1: You gotta make sure that the crust is really, really thin! You don't want it so thin that it break, but you want it pretty thin.

5) Place in the oven for 10 minutes to bake. Bake until it's golden brown. When done, take out and let cool.

To make the Milk Chocolate Fudge:

6) In a medium size bowl, place your butter and pour your sweet and condensed milk in the bowl. Place in the microwave in 30 second bursts until the butter has melted and the milk is hot.

7) Once the butter has melted and the milk is hot, place your milk chocolate in the bowl. TIP: Leave the chocolate in the bowl, submerged, in the hot milk for a few minutes without stirring it. After a few minutes stir until combined.

8) Place your fudge in a pipping bag fitted with a think round tip. Grab your cupcake try and start pipping the fudge into the Graham cracker crust. You will probably have left over, Simply put the extra fudge on a foil lined plate and place in the fridge. Once you finish, also place the try into the fridge for the fudge to set.

9) Once set, take the cupcakes out of the fridge. Fill another pipping bag with a star tip, with the Marshmallow Buttercream frosting. Start pipping a swirl on the cupcake.

10) To garnish, place some marshmallow minis, chocolate shavings and a piece of Hershey's Chocolate on top.

These cupcakes are so rich and delicious! Perfect summer dessert!


Happy Baking!

Wednesday, August 27, 2014

King Baker's Recipe #8: Rainbow Peppermint Patties

King Baker's Recipe #8: Rainbow Peppermint Patties
Inspired by yoyomax12


This delicious treat tastes like the commercial made Peppermint Patties! Except they have some pop of color! 

The Equipment you will need is:
1x Large Bowl
1x Hand Beater or 1x Wooden Spoon
2x treys lined with Parchment Paper
Extra Parchment paper
Rolling Pin

Prep Time: 15 minutes
Setting Time 3-4 Hours.

Ingredients:
2 1/2 CUPS Powdered Sugar 
1 1/2 TBSP Light Corn Syrup 
1 1/2 TBSP Water1 1/2 TBSP Vegetable Shortening (Crisco will work)1/4 TSP Peppermint Extract (You can use any type of Extract to change it up)Gel Food ColoringChocolate of your choice for dipping, about 8-12 oz.

Procedures:

1) In a large bowl place the sugar, water, corn syrup,shortening and mint extract. Blend well with an electric mixer or by hand until a soft dough forms.

2) Divide dough into six portions and dye each portion a different color.


3) Roll out a portion of dough on a piece of parchment until it is about 1/8" thick.

4) Cover with a piece of parchment and repeat with the next color making sure that they are roughly the same size and shape.

5) Continue this way: Parchment, new color rolled out, parchment etc. You will end up with a stack of colors separated by parchment.

6) Refrigerate at least an 1-2 hours or until dough is firm. (Freezing works as well)

7) Once they are firm you can begin stacking (on a piece of parchment) one color on top of the other pressing to make them stick together. 

8) Cover with a piece of parchment and roll out the combined layers until they it is about 1/4 " thick all over.

9) You can roll up the dough cake-roll style or you can cut out circles using a cookie cutter, Place the roll or the circles on a cookie sheet and freeze for 2-3 hours.

10) For the cut out circles, dip them into melted chocolate to coat and then place on a parchment/waxed paper covered cookie sheet. Refrigerate until chocolate has set.


TIP #1: If using the rolling method, slice 1/4 " thick slices from the frozen roll and dip each piece into melted chocolate. 


This is a yummy and delicious recipe! Peppermint and Chocolate is a great combination!  ENJOY!!!!!! 


Happy Baking!

Sunday, August 24, 2014

King Baker's Recipe #7: Nutella Cookies

King Baker's Recipe #7: NUTELLA COOKIES
Inspired  by Laura in the Kitchen's Recipe


Love Cookies? Love Nutella?! Than this recipe is for YOU! Nutella Cookies are probably one of the most delicious cookies I've ever eaten. It's so sweet, and nutellay, and delicious and just plain yummy! These cookies are super simple to make and if you are a nutella lover...... Well...... Just be prepared to be addicted for a LONG TIME! 

The Equipment you will need is:
1x Stand Mixer with Paddle attachment (OPTIONAL)
1x Medium Bowl
1x Large Bowl with Hand Beaters
1x Spatula
2x Baking Sheets lined with Parchment paper.
1x Small Ice cream scoop

Prep Time: 10 Minutes
Cooking Time: 10 Minutes

Ingredients:
1/2 CUP Unsalted butter, room temperature
1/2 CUP Brown Sugar
1/2 CUP Granulated Sugar
1 CUP of Nutella
2 Eggs
1 TSP of Vanilla Extract
2 CUPS of All Purpose Flour
1 TSP Baking Soda
1/4 TSP of Salt
1 TBSP of Cocoa Powder


Procedures:
1) Preheat your oven to 375 degrees F and make sure you have your baking sheets lined with parchment paper.

2) In a Medium size bowl, add flour, salt, cocoa powder, and baking soda. Set aside.

3) In your larger bowl or stand mixer bowl fitted with a paddle attachment, add your butter, brown sugar, and granulated sugar and cream it together. Once creamed, add in your eggs, vanilla and nutella. Mix together until it's well blended.

4) Add in your dry ingredients in with the wet. Mix together until it all comes together.

5) Using a small ice cream scoop, scoop out the cookie dough on your baking sheets at least 2 Inches apart. They will spread.

6) Bake in the oven for about 10 minutes. These cookies will spread out and puff up when it's in the oven, that's normal. When you take them out and let them cool, they will flatten out.

7) Let them cool and ENJOY!!!!

These cookies will sure fill anyone's need for nutella and cookies!

Happy Baking!

Friday, August 22, 2014

King Baker's Confectionery UPDATE 8/22/14!

Hello Bakers!

I just wanted to give you all an update on what's happening in the King Baker's Kitchen! You might have noticed that we've started posting more recently. That is because we have SO MANY recipes we would like to share and we have figured out a final schedule for at least a while. The schedule is as followed:

Recipes will be posted on SUNDAY, WEDNESDAY and SATURDAY!

Yes! We've added Sunday and Saturday to the mix! Because we are posting 3 times a week, be looking out for new recipes, as well as Baking Tips, Cake Decorating Directions, and more! This change will come into affect on August 24th!

We are so excited and so happy to have such great followers and LOVE sharing the love of baking to others!

Be sure to follow us on all the social media as well!

FOLLOW US @:

INSTAGRAM: @kingbakersconfectionery
FACEBOOK: www.facebook.com/kingbakersconfectionery

Tumblr and Google+ are coming out very soon!

HAPPY BAKING!!!

Wednesday, August 20, 2014

King Baker's Recipe #6: FUNNEL CAKE

RECIPE #5: Funnel Cake


Ever go the the carnival or the local fair, or a local theme park and get the classic Funnel Cake? I know I have and tastes SO GOOD! I've always wondered how it was made and if I could make it at home. Well, With this recipe, you too can make the classic carnival treat! 

The Equipment you will need is:
1x Large Pot with Vegetable Oil filled HALF WAY up.
1x Whisk/Spatula
2x Bowls
1x Funnel Cake Spout/Pourer (I don't have one, so I just used a small measuring cup that has a little spout and a handle.)
1x Baking Sheet lined with Paper Towels


Prep Time: 10 Minutes
Cooking Time: 10 Minutes

Ingredients:
1 3/4 CUPS of Milk
2 1/2 CUPS of All Purpose Flour
2 Eggs
1/4 CUPS of Granulated Sugar
1/2 TSP of Salt
1 TBSP Baking Powder
1 TSP of Vanilla Extract
Vegetable Oil for Frying
Confectioner/Powder Sugar


Procedures:
1) Fill your large pot halfway with oil and allow to get really hot. (375 works best)

2) In a large bowl, whisk together flour, sugar, salt and baking powder, place it aside.

3) In a separate bowl, add milk, eggs, and vanilla. Mix together. Add the wet ingredients in with the dry. Whisk together until combined. The batter should be slightly/if not exactly like pancake batter. If it's too thick, Add a little more milk.

4) Place some of the batter in your funnel cake spout/pourer and/or your measuring cup with a spout. Start pouring into your very hot frying pot in circles and zig-zags.

5) Let them cook for about 2-3 minutes on each side. They should be a very deep golden brown and crispy. Afterwards, take them out and place them on the paper towel lined baking sheet.

6) Let the Funnel Cakes drain on the paper towel and top it with Confectioner/Powder Sugar.

*7) If you want, you can add anything you want besides Powder sugar. You could drizzle chocolate, strawberries, bananas and more!

These are best served right away. Enjoy this wonderful treat!! :)


Happy Baking!

Sunday, August 17, 2014

King Baker's Recipe #5: Shasha Cookies (No-bake Chocolate Peanut Butter Cookies!)

RECIPE #5: Shasha Cookies (No-bake Chocolate Peanut Butter cookies.)


This recipe was inspired by one of our former babysitters. Her nick name was Shasha and she was an amazing babysitter. These cookies were her absolute favorite cookies and every time we would make them, we made them for her. The original recipe didn't have a name except what you see above. We decided to name the cookies after her! These are a very popular treat in our household and this recipe is dedicated to her! 

The Equipment you will need is:
1x Dutch Pot (or just a LARGE POT)
1x Wooden Spoon/Large Spoon
1-2x WAX Paper lined Baking Sheet
1x Cookie Scoop (or two spoons)


Prep Time: 5 Minutes
Cooking Time: 10-15 Minutes
Cooling Time: 45-60 Minutes

Ingredients:
1 stick of OLEO (Do NOT use butter)
2 CUPS Sugar
1/2 CUP Milk
1 CUP Crunchy Peanut Butter
6 TBSP Cocoa Powder
3 Cups Quick-Cooking Oatmeal
1 TSP Vanilla Extract


Procedures:
1) In a large heavy pot combine Oleo, Sugar, and Milk.  Cook over MEDIUM heat stirring to dissolve the sugar.

2) When the first little bubbles appear, cook one more minute. The Mixture will be runny.

3) Remove from heat. ADD Peanut Butter, Cocoa Powder, and Oatmeal, and Vanilla Extract. Stir quickly to combine.

4) On 2 cookie sheets lined with WAX PAPER, scoop or spoon out about a tablespoon or two of the mixture into mounds. DO NOT EVEN THINK of rolling it into a ball. It is piping HOT!

5) Let them cool for 45-60 Minutes and ENJOY!!!!

Happy Baking!

Wednesday, August 13, 2014

King Baker's Recipe #4: No-Bake Chocolate Chip Cookie Dough Minis

RECIPE #4: No-Bake Chocolate Chip Cookie Dough Minis


Whenever you bake Chocolate Chip Cookies, do you or a family member snack on the cookie dough before it goes in the oven? Well, Look no more! This recipe will fill you or your family members crave for that cookie dough. This recipe requires no baking as well! So, it's perfect for the summer when you don't want to turn your oven on! King Baker's Confectionery Presents: No-Bake Chocolate Chip Cookie Dough!

This recipe is so simple and easy to do!

The Equipment you will need is:
1x Medium Bowl
1x Rubber Spatula
1x Handheld mixer.
1x Parchment Lined Baking Sheet


Prep Time: 10 Minutes
Setting Time: 15-30 Minutes

Ingredients:
3/4 CUP Butter, softened.
1/2 CUP white caster sugar
1 CUP Brown Sugar
1 TSP Vanilla Extract
1/2 TSP Salt
2 CUP All Purpose Flour
4 TBSP Milk
3/4 CUPS Mini Chocolate Chips (These work so much better than the regular sized Chips.)


Procedures:
1) In a medium sized bowl, place your butter, brown sugar, and granulated sugar and cream them together using your handheld mixer. Beat it until it's light and fluffy.

2) Add in your Vanilla Extract, Salt, and Milk blend well.

3) Add the flour, using your spatula, mix until flour is blended.

4) Fold in the mini chocolate chips until it's well combined and evenly distributed.

5) Using your hands or a cookie scoop, roll the dough into 1-inch balls and place on the parchment lined baking sheet.

6) Place the sheet of cookie dough minis in the refrigerator to chill for at least 15-30 minutes.

They are best served cold! When you take them out let them thaw for about 5-7 minutes then begin snacking on them! YUM!!!!!


Happy Baking!

Sunday, August 10, 2014

SURPRISE! King Baker's Recipe #3: Milk Chocolate Fudge Recipe

RECIPE #3: MILK CHOCOLATE FUDGE


SURPRISE! Today is a surprise recipe day! Today's recipe is probably the easiest recipe you will ever come across! This is a very simple, 3 ingredient Milk Chocolate Fudge. It's creamy and delicious!

This recipe is very versatile as well! You can use Dark Chocolate, White Chocolate or any type of chocolate.

The Equipment you will need is:
1x Medium/Large Bowl
1x Rubber Spatula
1x Microwave
1x 8" Pan
Foil Paper and Cooking Spray/Veggie Oil

Prep Time: 5 Minutes
Cooking time: 2-3.5 Minutes
Setting Time: 2-4 Hours

Ingredients:
14 oz Sweet and Condense Milk
14 oz Milk Chocolate (Or any chocolate you desire.)
1.75 oz Unsalted Butter

Procedures:
1) Line your 8" pan with foil paper and spray with cooking spray or veggie oil.

2) In your medium/large bowl, place your butter and your can of Sweet and Condense Milk.

3) Place the bowl in the microwave for 30 second intervals, stirring in between. Should take 2-3 minutes or until the butter is completely melted.

4) Once your mixture is mixed and melted completely, Add in your chocolate. Let the chocolate sit in the warm mixture for about 3-5 minutes.

5) Begin stirring the mixture and the chocolate will begin to melt. It will become a very thick batter.

6) Once you've mixed it well, Place the batter in the greased foiled pan. Smooth out the top.

7) Place the pan in the Fridge to chill for 2-4 hours.

Cut into pieces and enjoy this simple, creamy, delicious Milk Chocolate Fudge!

Happy Baking!

Wednesday, August 6, 2014

King Baker's Recipe #2: Classic Snickerdoodle Cookies!

RECIPE #2: CLASSIC SNICKERDOODLE


This recipe is an absolute classic! Snickerdoodle Cookies are an amazing treat to have in a jar in your kitchen. And now, you can too enjoy the delicious cookie with just a few basic ingredients.


The Equipment you will need is:
1x Stand Mixer OR 1x Large Bowl
1x Wooden or Regular Spoon
1x Extra Large Bowl and 1x Small Bowl1x-2x Large Baking Sheets that are lined with Parchment paper1x Cookie Scoop

Prep Time: 20 Minutes

Cooking time: 8-10 Minutes

Ingredients:

1 CUP Unsalted Butter or Shortening

1 1/2 CUPS Sugar

2 Eggs, lightly beaten

2 3/4 CUPS Flour
2 TSP. Cream of Tartar
1 TSP. Baking Soda
1/2 TSP. Salt

2 TBSP. Sugar
2 TBSP. Cinnamon

TIP #1: Make sure that your Butter is at room temperature. In order to achieve this, leave the butter out over night, or place it in the Microwave for 10 second bursts. DO NOT MELT THE BUTTER! 

Procedures:

1) In a large bowl and/or Stand mixer, fitted with the paddle attachment, place your butter and 1 1/2 CUPS of Sugar in the bowl and cream them together until it's light and fluffy.

2) Add in your Eggs. 

3) In a separate bowl, combine Flour, cream of Tartar, baking soda, and salt. And Lightly mix together.

4) In batches, slowly add in the dry ingredients and stir.


TIP #2: When stirring in dry ingredients, You DO NOT want to over mix it. Only mix until you can't see anymore flour.

5) Once everything is blended well, Wrap the dough in plastic wrap and set in the fridge to chill for at least 2 hours.

6) Pre-heat your oven to 400 degrees F.  Make sure you have your baking sheets lined with Parchment paper.


7) In a small bowl, combine your sugar and cinnamon.


8) Take the plastic wrapped cookie dough out of the fridge and place in the same bowl you mixed it in. 


9) With your cookie scoop or simply a tablespoon, scoop up some dough and roll it in a ball.


10) Place it in the small bowl with Cinnamon Sugar and roll around to coat well.

TIP #3: If you want it to be covered completely in Cinnamon, Use a spoon and waterfall the dough ball in the mixture. 

11) Place the dough balls on the cookie sheet that has been lined with parchment paper. 

12) Place in the 400 degree F oven for 8-10 Minutes. Start Checking around the 9 minute mark.

Once finish, take out of the oven and ENJOY!!!! 

This is my absolute favorite type of cookie and the recipe is so easy to make, you can certainly find a snickerdoodle around my house! 


Happy Baking!